This article explains how to rescan plug-ins in Ableton Live if you can not see your installed plugin. If you are using custom Plugin folders, click here.
Before you scan
-
Update Ableton Live (VST3 is only included in Live 10.1 or later)
-
Keep your plugins up-to-date: Open your UJAM App and check if an update for your plugin is available.
-
Restart your computer.
Make sure you've installed the plug-in to the correct location.
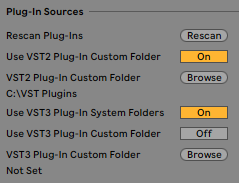
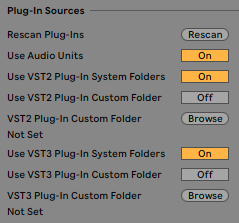
Ableton Live supports VST2 and VST3 on Windows and VST2, VST3 and AU on Mac. Make sure that you've installed the correct version of the plug-in to the correct plug-in folder.
- Open Live's Preferences → Plug-ins.
- Check the plug-in folder locations.
- Depending on which version you have installed, make sure you've installed it correctly to that folder.
- If using VST2 or VST3, enable the correct folder (System or Custom).
- If using Audio Units (AU), enable the system folder. (Mac Only)
Windows
Mac
Turn the plug-in folder off and on again.
If you have verified that you have installed it to the correct folder, and that folder is active in Live's Preferences → Plug-ins, then disable the plug-in folder and re-enable it.
Manual Rescan
-
Open "Preferences" (macOS: CMD + "," / Win: CTRL + ",")
-
Click the header "Plug-ins" (left side of the Preferences Window)
-
Click "Rescan", on the very top of the window
- Optional: hold "ALT(Win)/Option(macOS)" while clicking Rescan (-> forces Live to scan all Plugins, not matter if new or old)
This causes Ableton Live to rescan all Plugin directories, searching for newly installed plugins. Another solution could be to click and hold "alt" while clicking "Rescan", which will force Ableton to scan ALL plugins, no matter if newly installed or old.
If your plugin still is not recognised, it is possible that it is not installed in the correct location. In order to fix this issue, ensure that the following default paths exist:
macOS
-
{SYSDRIVE}:\Library\Audio\Plug-Ins\VST\*PluginName*
-
or (if VST3)
-
{SYSDRIVE}:\Library\Audio\Plug-Ins\VST3\*PluginName*
-
{SYSDRIVE}:\Library\Audio\Plug-Ins\Components\*PluginName*
Windows
-
{SYSDRIVE}:\Program Files\VstPlugins\UJAM\*PluginName*
-
{SYSDRIVE}:\Program Files (x86)\VstPlugins\UJAM\*PluginName*
Using custom plugin directories
If the problem still persists, you may have installed your plugins into a custom plugin directory (e.g. an external drive). If thats the case, insert the path to this directory into the corresponding field in Live's "Preferences" Window (e.g. "VST2 Plug-In Custom Folder", see image below). You have to activate the toggle above the "Browse" Button (it should be yellow, saying "On").
As a last option, here is the link to Ableton's Knowledge Base, explaining all options in great detail:
https://help.ableton.com/hc/en-us/articles/115000349184-VST-AU-plug-in-doesn-t-appear-in-Live-s-Browser
Comments
0 comments
Article is closed for comments.