Welcome to Virtual Drummer
Virtual Drummer Series
Thanks for trying, choosing or upgrading to Virtual Drummer. We hope these powerful virtual instruments will provide years of fun and great drum tracks for you!
At the heart of all Virtual Drummers is the idea that you can create professional sounding instrument tracks exactly the way you would get them from a drummer in the studio. There, you’d give them a lead sheet, adjust sound character and mix, and tell your player what kind of musical style and performance you’re expecting, and a great player would deliver exactly that.
A Virtual Drummer does that too: the song parts become MIDI notes in your DAW, there are controls for drum kit and mix, you load Styles and select parts in real-time, there are performance controls to vary the performance, and last but not least you can choose from a variety of adjustable mixing console settings.
Whatever a Virtual Drummer does, it does it extremely well and fast, while asking absolutely minimal effort from you. We never sacrifice instant gratification and simplicity in favor of a more complex result!
You and Us
Virtual Drummer was built by musicians for musicians. We at UJAM are a pretty diverse bunch – from DJ to Drummer, weekend producer to Oscar-awarded Hollywood composer. We build every product for ourselves, and, like you, we’re all users of our Virtual Instruments - from Guitarists to Bassists to Drummers and Beatmakers.
This means that before we even start developing, a lot of thought and discussion goes into finding out what you, the user, will expect from the product, what problem it solves, which controls we can remove to make the product more inviting and simpler, which hurdles we can move out of the way.
Virtual Drummers are optimized for one clear, powerful purpose: To produce great-sounding drum tracks without distracting you from the complex endeavor that producing a song is.
We hope that Virtual Drummers transpire that philosophy in everything you do with it.
Series Titles
Virtual Drummers all share an identical foundation, but the most important aspect is different between the titles: Each title has its own distinct personality in terms of musical style and sound aesthetic, which is reflected in the name and look.
VD LEGEND
Enter the studio of the ‘70s icons who innovated the dry drum sound. This punchy drummer cuts through mixes with a warm, retro feel. Customize LEGEND for varnished beats and raw jams alike.
VD HOT
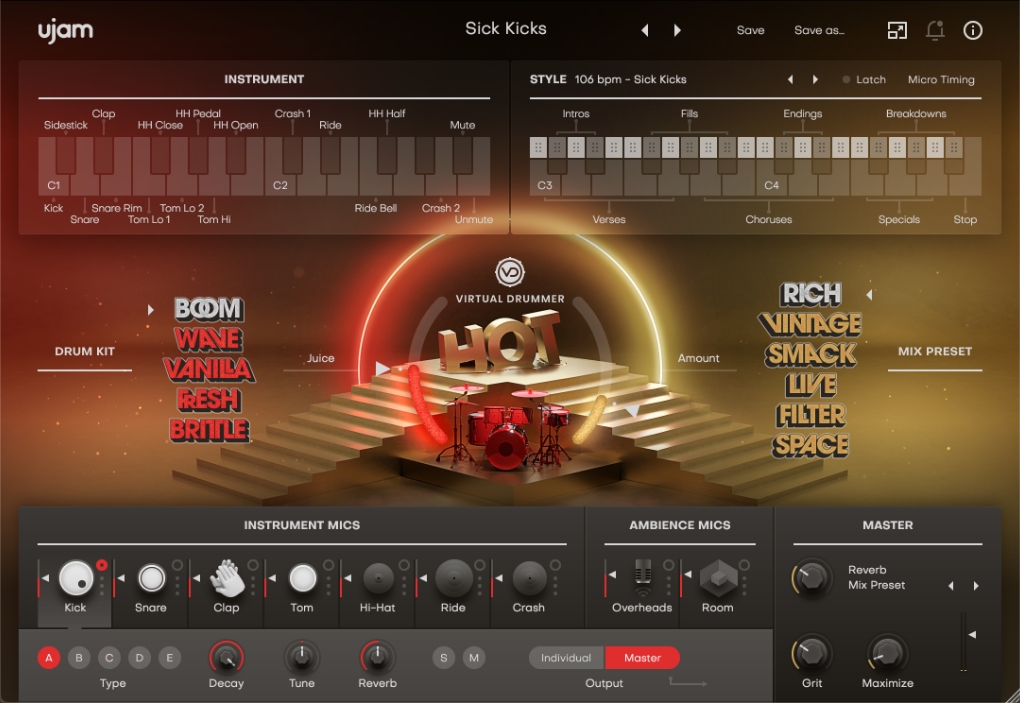
The coolest drummer out there, bringing you the most attractive drum grooves and sounds inspired by the most popular top-charting music.
VD BRUTE
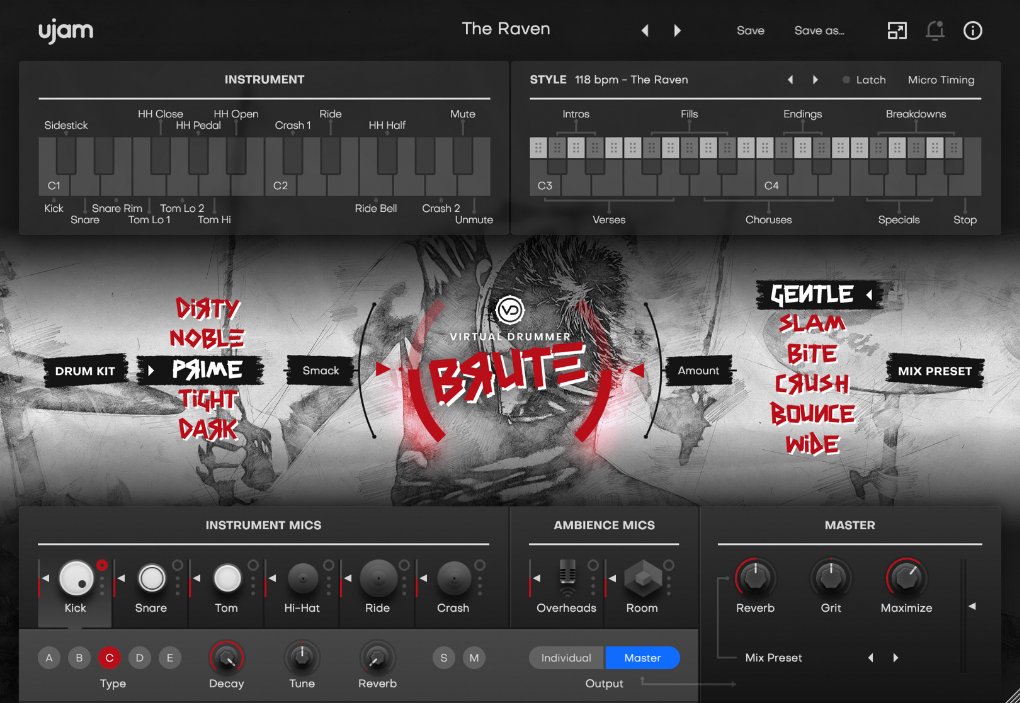
A modern rock drummer with a rebel attitude - based on recording and production techniques established in the mid 90s and still a benchmark for today’s productions.
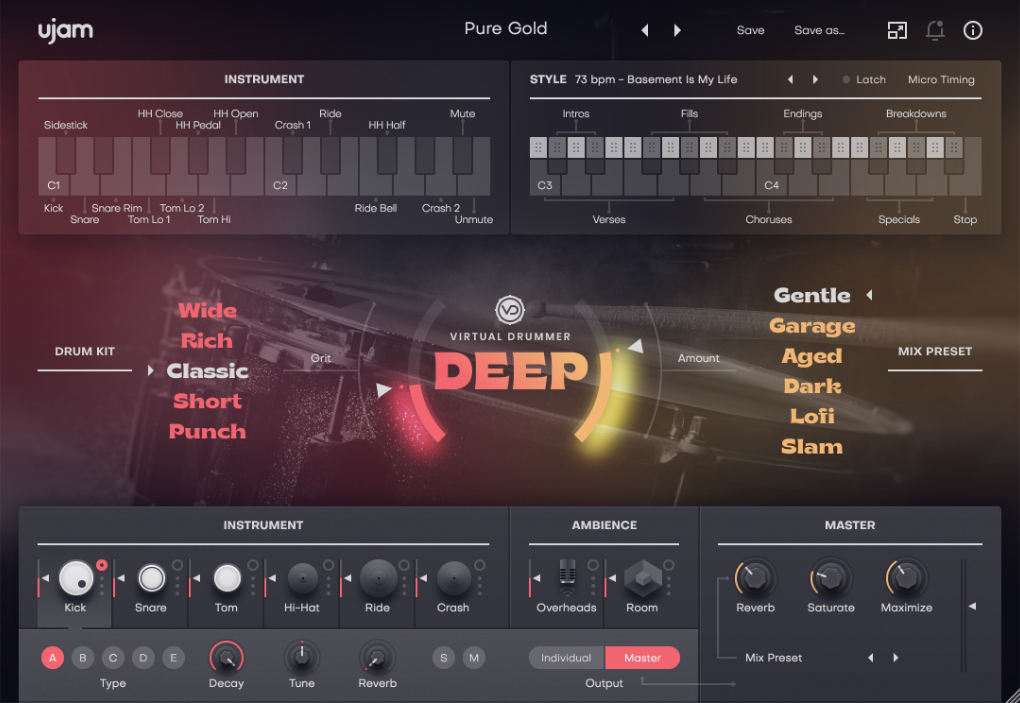
VD DEEP
The most spirited drummer, standing on the shoulders of traditional genres like Soul and Funk, with its gaze firmly set on contemporary styles and timeless future classics.
VD PHAT

A slick and funky Hip-hop drummer, producing grooves, fills and breaks straight from the street! The drums sound dry, performances lean on funky with human feel, and mixes add grunge, dirt and vintage feel to the sound.
VD HEAVY
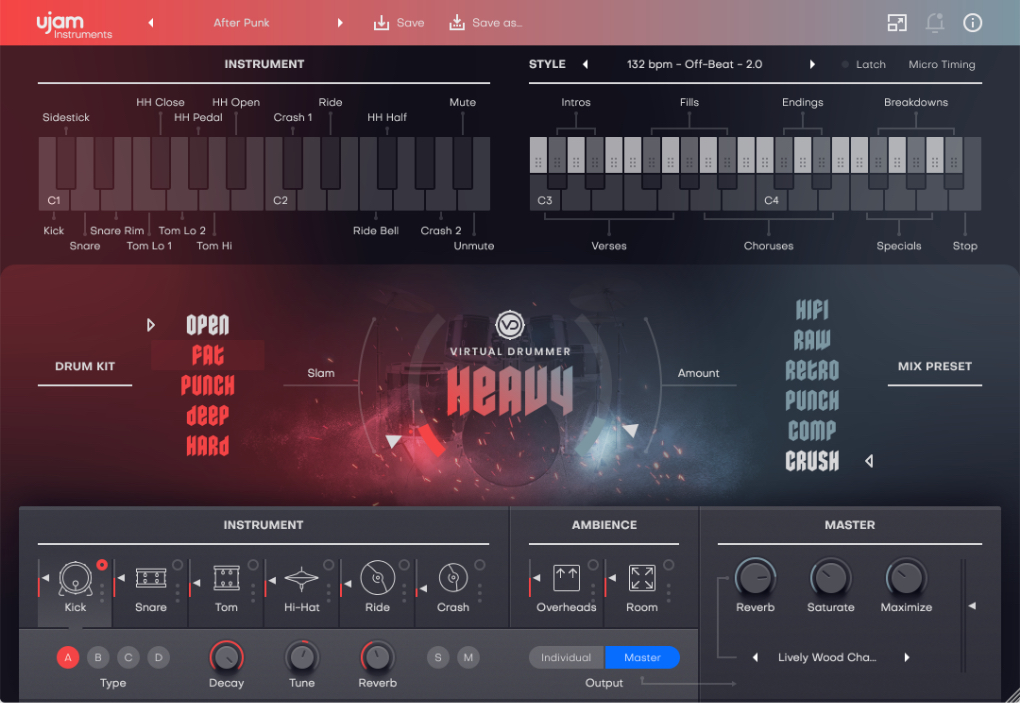
A heavy hitter in the literal sense, punishing the drums with relentless weight and energy behind each hit - the basis for all sorts of 80s rock, indie and grunge styles.
VD SOLID
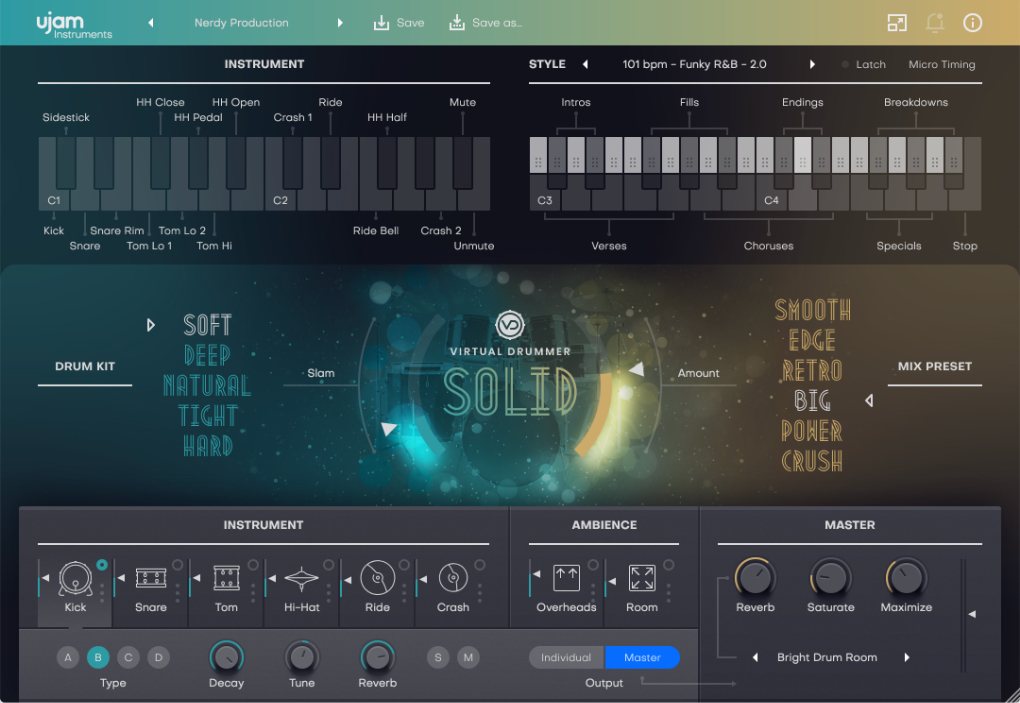
A gold-standard session drummer - comfortable playing all popular styles and moods with ease and reliability. Rock, Pop, Ballads - anything that needs a modern, polished drum sound and mix.
Why So Few Controls?
We are all musicians and we know that the time for learning a user interface is better spent making music. Also, unlike many virtual drum instruments, we do not expect our users to bring in-depth knowledge about drum kits, microphones, and sound engineering – because let’s admit it: We can’t possibly know everything.
Therefore, the concept and user interface of Virtual Drummer are designed for maximum ease-of-use and minimum distraction. There is a lot of intelligence going on under the hood so you can focus on your music.
The user interface is also fail-proof in that no matter how you set up the controls of Virtual Drummer, the result will never be musically or technically wrong – and this is true without sacrificing any creative freedom.
You can trust in the fact that tracks produced with Virtual Drummer are realistic, professionally produced drum tracks.
Installing Virtual Drummer
The easiest way to install Virtual Drummer titles is via the UJAM App. Alternatively, you can download a direct installer from the ‘Your Products’ page in your account on our website.
Installing from the UJAM App

We recommend downloading and installing Virtual Drummer from the UJAM App – it doesn’t matter if you’ve purchased it or are just starting the 7-day trial period.
The UJAM App will always display all available Virtual Drummer titles. You can choose one, a few or all titles from here.
Installing Without the UJAM App
You can install any UJAM product without using the UJAM App. Just follow these steps:
- Log into your UJAM account
- Navigate to your ‘Backstage’ account overview
- Click ‘Head to Products’ to view all of your products:
- Navigate to Virtual Drummer and select the option to ‘download the installer’ instead
When you start a trial from a button on a product page, you may be taken to your account or asked to create one if you’re new to UJAM – just follow the steps there as well.
Trial and Authorization
We have designed the entire process of downloading, activating and authorizing Virtual Drummer with a strong focus on simplicity. It’s important to us to make it as easy as possible for you to get your hands on Virtual Drummer - and make it your own if you like it. If you have the product license in your UJAM account and you sign in to the UJAM App, the respective plugin will get authorized automatically.
Trying, Buying, Authorizing
We only want you to spend money if you’re absolutely happy with Virtual Drummer. Therefore, we grant you a 7-day trial period, during which the plug-in will run without any limitation. When opening Virtual Drummer during the trial period (or when clicking the Authorize button in the menu bar), you will see the following overlay which:
- Displays information about your trial status
- Provides a link to the Virtual Drummer website where you can purchase a permanent Virtual Drummer individual or bundle license, after or during the trial period
- Allows you to enter your credentials and authorize Virtual Drummer once you’ve purchased it.
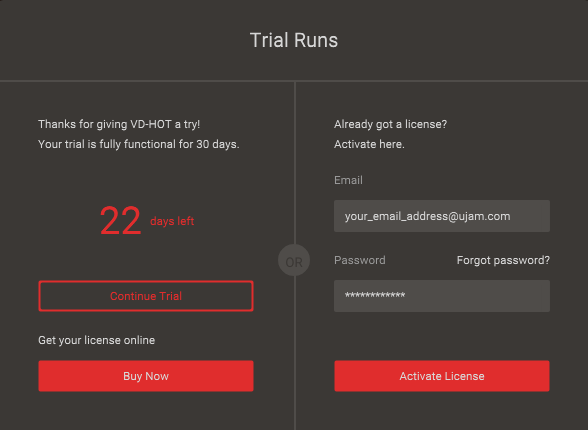
Trial & Authorization Overlay
Where to Put the Content
The actual drum goodness of Virtual Drummer – the audio content - is packed into so-called blob files named VD-<title>.blob. Usually there is a part1 and a part2 blob file. You can keep the blob files anywhere you like (e.g. on a separate content drive), just make sure that part1 and part2 are always in the same folder, as they technically depend on each other.

During standard installation, it will be put into the following locations on your main system drive:
| macOS | /Library/Application/Support/UJAM/<title>/ |
| Windows | /ProgramData/UJAM/<title>/ |
Changing the Content Location After Installation
You can always move the VD blob files after you have installed Virtual Drummer:
- Move your file to the desired location (in a different folder or on a different drive)
- Launch your DAW and open Virtual Drummer. It will present you with a dialog asking for the file location. Simply point to the new location of the blob file – done.
Controller Hardware for Virtual Drummer
Virtual Drummer requires MIDI note input for playing and recording musical performances, and optionally Pitch Bend, Modulation and Sustain Pedal data for added real-time variation.
If you have a MIDI controller (keyboard or pad controller), this will be the easiest and most straightforward MIDI input method and it’s most fun as this way you control your Drummer in real-time.
Of course, you can also control Virtual Drummer by using MIDI step sequencers or by entering MIDI notes manually into MIDI tracks.
For testing purposes while you’re getting to know your new Virtual Drummer, you can always use the Interactive Keyboard in the top half of the Virtual Drummer interface. This works best with the Latch function enabled.
Start Playing!
Before we look at things in more depth, let’s first explore how to play Virtual Drummer, as that may be all you need for now.
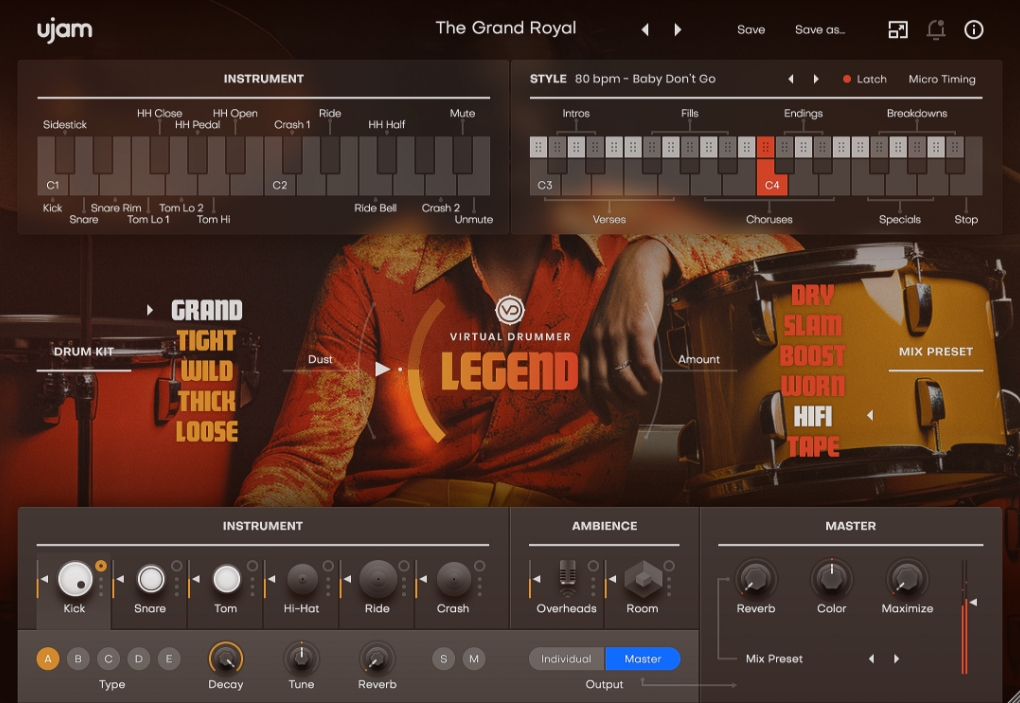
Look at the top half of the Virtual Drummer window. It is dedicated to the Drummer’s performance – in other words: What and how your session drummer plays.
Look at the interactive keyboard first - the left half allows you to control the individual instruments, while the right half will play Phrases and grooves for you.

Interactive Keyboard
The basic principle is simple:
- When you press the lower, darker halves of the keys from C3* upwards, Virtual Drummer will start playing Phrases that groove – conveniently organized by song structure. When you release the key(s), playback will stop (unless Latch is enabled!)
- The upper, brighter half of the right keyboard lets you drag and drop the Phrases into your DAW’s MIDI track for advanced editing
- MIDI notes below A#3 play (and display) individual drum hits.
- By turning up the Modulation wheel, you can smoothly control the intensity of the drummer’s performance. This lets you create crescendos/decrescendos as well as allows you to set song parts apart from each other.
If you know these basic things and can switch presets, you know all you need to start producing with Virtual Drummer.
*C3 is middle C. The MIDI note number is 60. Some DAWs refer to it as C4.
Walkthrough
If you’re pressed for time or if you already know the basic concepts behind virtual drum instruments, then this Walkthrough may be all you need for now, and you can come back later to look up more detailed explanations as you need them.
We will take a quick tour across all controls of Virtual Drummer. After this you will have a good basic understanding.
We assume you have any of the Virtual Drummers opened in your DAW. Ideally you have a MIDI controller connected, otherwise use the Interactive Keyboard.
Make a Sound and Learn About Keys
- Start your DAW and open Virtual Drummer - it will load a default Style that’s all you need for now – and activate the Latch button.
- Now hit key C3 on your MIDI keyboard (or on the interactive keyboard) and Virtual Drummer will start playing a Verse.
- The Interactive Keyboard plays and phrases notes when you click the lower half of each key.
- It also doubles as a display for the MIDI notes Virtual Drummer is receiving. The keyboard is divided and properly labeled with the functions of the corresponding note ranges.
- Move up the white keys to go from Verse to Chorus and other parts.
Tell Your Player What to Play
- Now try black keys and notice how they behave differently. Intros play only once and then fall back to the previously active part, and so do Fills, while Breakdowns play while you hold them, and Endings finish off the song.
- To gradually tweak the performance, turn the Mod Wheel up and notice how the drummer gradually goes softer.
- Move the Pitch wheel up to mute the kick drum, or down to mute the snare. This is great for intermezzos and lead-ins.
Try the Presets
- At the top of the Virtual Drummer window you can load presets. A preset is always a complete setting of Virtual Drummer, i.e. it will change the performance as well as the drum kit and mixer console setup. At this point, just go through different presets and try different Style Phrases to get an impression of the musical and sonic palette of Virtual Drummer.
- Activate the Latch button right next to the Style Bar. Now Virtual Drummer will keep playing even if you don’t hold a note.
- Keep a groove playing, and go through the various drum kits on the left side. Notice how they are descriptively named from soft to hard.
Build Songs in your DAW
- Click and hold the top half of any phrase key on the interactive keyboard (marked with a square of dots) and drag into your Virtual Drummer track in your DAW. A region with the MIDI notes of that phrase will appear in that track.
- Do the same with different keys to build a song structure. You may even switch styles in between, or even Virtual Drummers if you have more than one. It all works together!
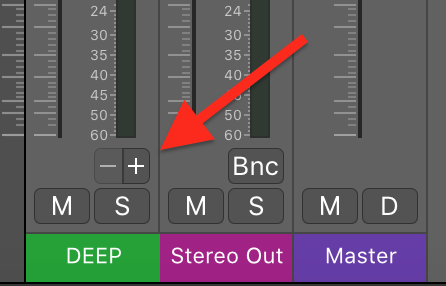
Change the Drum Kit
- Try the various level controls from Kick to Room and notice their impact on the sound of the drum kit.
- Select different drum instruments for each channel and play with the other parameters such as decay and tune. Also try the filters in the Overhead and Room channels.
Change the Mix
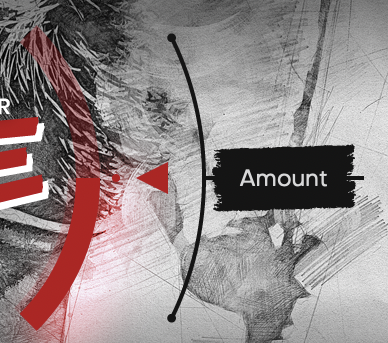
- Switch the Mix Preset on the right side of Virtual Drummer. Play with the Amount control and see what difference it makes.
- Try the controls in the Master Section, such as Saturation or Maximizer.
- Finally, try the Slam Control. It’s exactly what the name says: a really powerful compressor.
Background: Styles and Phrases
It is important to know that Virtual Drummer does neither require you to know how to play a drum kit on a keyboard, nor to think about how to emulate realistic drum techniques. It has all that built-in, simply because it is based on actual drum performances. What Virtual Drummer emulates is therefore a studio drummer who already knows how to play.
The foundation of all styles and phrases of Virtual Drummer are live performances of professional drummers. During the sessions for Virtual Drummer, hours of live performances of professional drummers were recorded to pre-recorded instrument tracks on a high-end virtual drum kit for meticulous timing and feel. Subsequently, they were optimized to match the dynamic response of the drum kits built into Virtual Drummer to re-create the groove and feel of the original performance.
But what’s more: Because the actual notes, drum sounds and mixing gear are separated inside Virtual Drummer, you can play any groove with any kit, and also flexibly customize the drum track and mix to your musical taste and mix.
Note: If you use the drag and drop feature, you can even exchange phrases between styles. If you have two or three Virtual Drummer, that is even true between Virtual Drummers.
Menu Bar
The top bar of the Virtual Drummer interface lets you load and save presets. It also contains important management functions from checking your trial status to contacting support.
Menu Bar
Resizable Interface
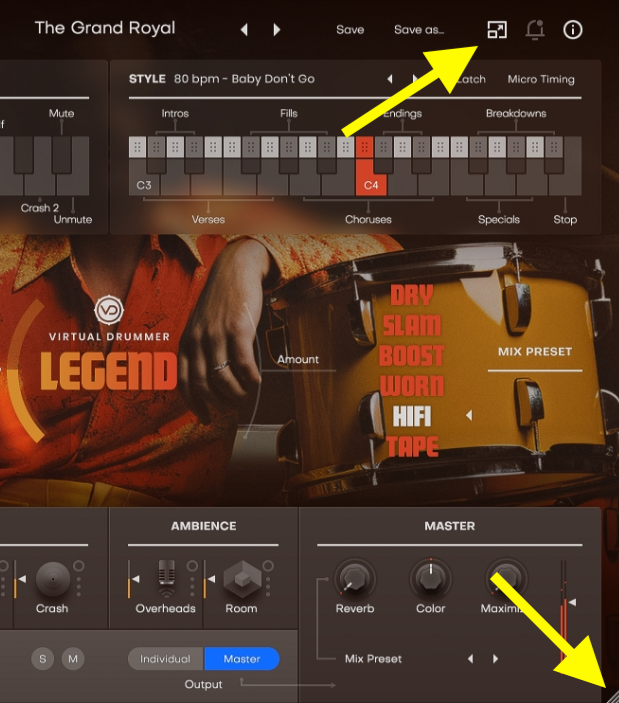
User interfaces are resizable to fit on all screen sizes. To resize, either click the “window” icon next to the notification bell in the top right corner, or simply drag the striped handle in the bottom right corner of the user interface.
Loading Presets
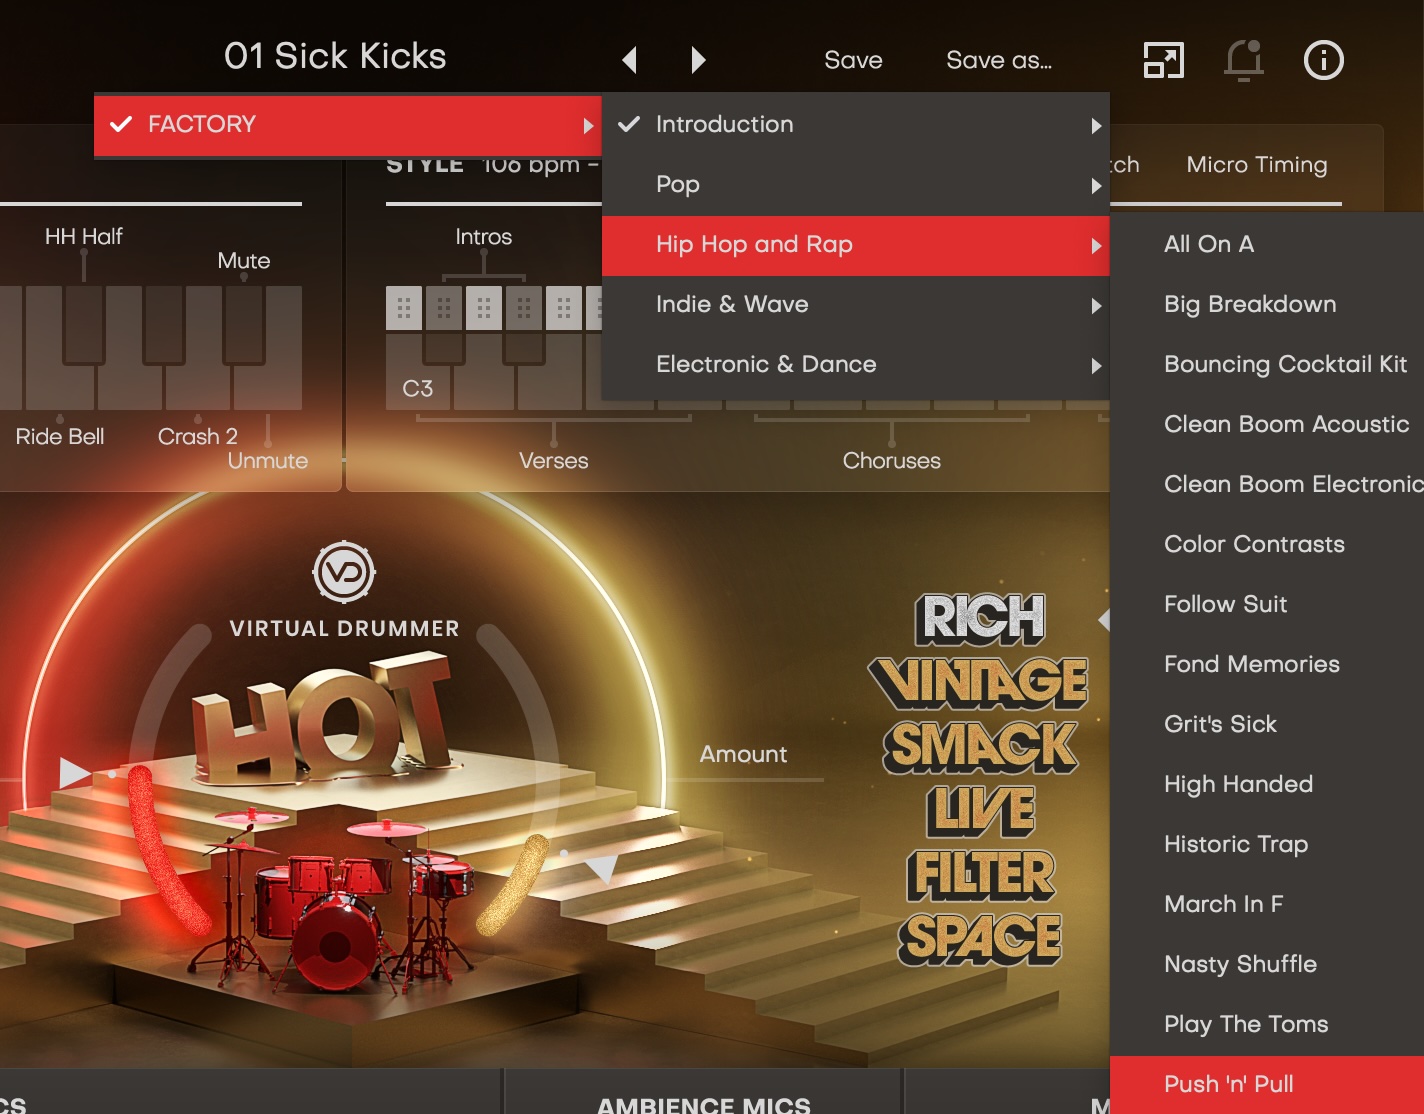
Preset Browser of VD HOT
A preset in Virtual Drummer is a complete setting of the entire plug-in including Style selection and all control settings. Here’s how you can switch presets:
- Advance to the next preset by clicking one of the arrows left and right of the PRESET name
- Click on the name of the current preset in the PRESET menu to open the Preset Browser (see image above).
As you can see, the Preset Browser is a clean, organized list of presets, categorized by simple musical terms.
Take your time exploring the Presets, as this is the quickest way of getting an overview of what Virtual Drummer can do!
If you have freshly installed Virtual Drummer, there will only be Factory Presets. User Presets will appear once you have saved your first own preset.
Save & Save as …

You can of course save your own Virtual Drummer presets. You can name them and assign a category too.
The difference between the Save and Save as … buttons:
- Save overwrites the preset with the changes you just made.
- Save as … lets you assign a name and a category, so does not replace the current preset.
Note: Factory Presets can only be saved using Save As …, they cannot be overwritten.
Moving, Renaming and Deleting Presets
You can move, rename or delete Presets directly in your operating system. You will find Virtual Drummer Presets in these folders:
| macOS | Factory Presets | /Library/Application Support/UJAM/VD-<title>/Presets |
| User Presets | /Users/USERNAME/Library/Application Support/UJAM/VD-<title>/Presets | |
| Windows | Factory Presets | C:\ProgramData\UJAM\VD-<title>\Presets |
| User Presets | C:\Users\USERNAME\AppData\Roaming\UJAM\VD-<title>\Presets |
Notifications
When you launch Virtual Drummer, it will automatically check for updates. If an update is available, the update icon will be highlighted.
Clicking it will open a dialog that lets you choose whether you want to download the update now or later.
About Page
Clicking on the circled “i” in the top right banner of the user interface of your Virtual Drummer opens the Information page where you can find detailed information about your plug-in’s build as well as links to the Acknowledgments, Product Page, Support, User Manual and License Agreement.
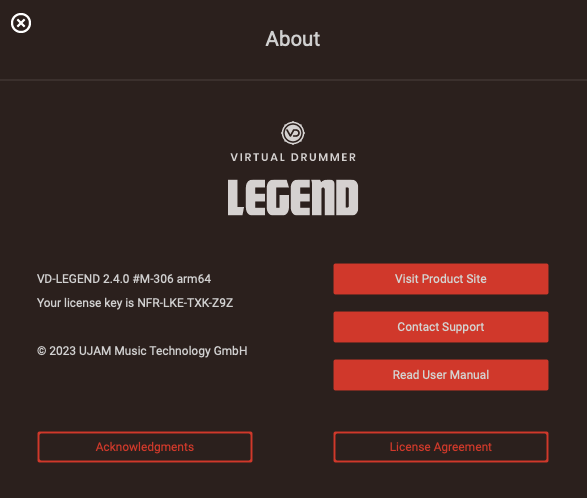
About Page of VD LEGEND
- Visit Product Site – takes you to ujam.com with regularly updated news, videos, tutorials, and other helpful stuff.
- Contact Support – lets you report problems and ask questions.
- Read User Manual – opens this document.
- Acknowledgments – the people behind Virtual Drummer.
- License Agreement – legalese stuff for gourmets.
Playing Virtual Drummer

Interactive Keyboard
The Interactive Keyboard is the heart of Virtual Drummer’s performances. Here you can:
- Play individual drum hits (left half)
- Create entire song performances by playing Phrases (right half)
- Build songs in your DAW by using the Drag and Drop feature (top half of Phrase keys)
Playing Individual Drums
The left half of the Interactive Keyboard shows you which keys play which drum instrument.
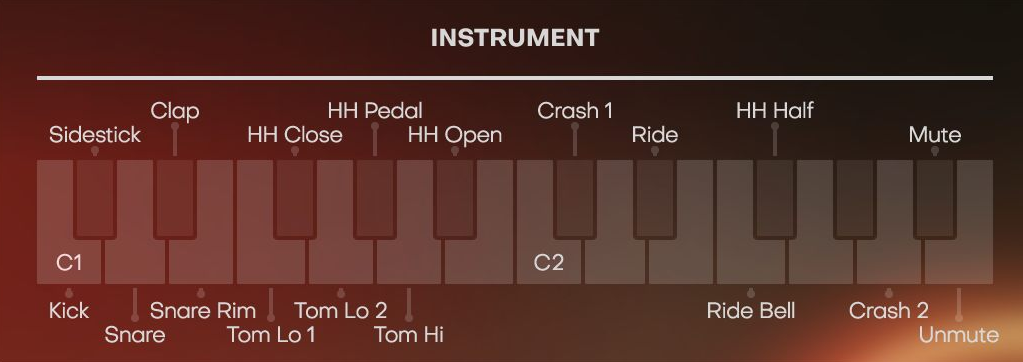
Instrument Section
Playing individual instruments is only necessary if you want to program your own drum tracks or if you want to manually add extra hits to a performance created by Virtual Drummer.
Note: While you can test individual drum sounds on the Interactive Keyboard, these notes won’t be recorded in your DAW. For recording individual hits, use a MIDI controller, which has the added benefit of velocity control.
Mute Mode
You can temporarily exclude individual instruments from phrase playback with keys G#2 and Bb2:
- Hold key A#2 and press an instrument key to mute the instrument (exclude it from phrase playback).
- Hold key B2 and press the instrument key to unmute again.
- Note that you are still able to play the individual instrument hits while the instrument is muted. This way, you can e.g. mute the snares from phrase playback to play them manually.
Creating Song Performances
Using the right half of the Interactive Keyboard or the corresponding MIDI notes, Virtual Drummer can play entire drum performances – i.e. all you need to do is tell your drummer which part to play when, and it will lay down a complete song in a specific Style.
Accordingly, in Virtual Drummer, drum performances are organized into Styles and Phrases. There are 30 styles in each Virtual Drummer, each covering a particular groove or rhythmic characteristic.
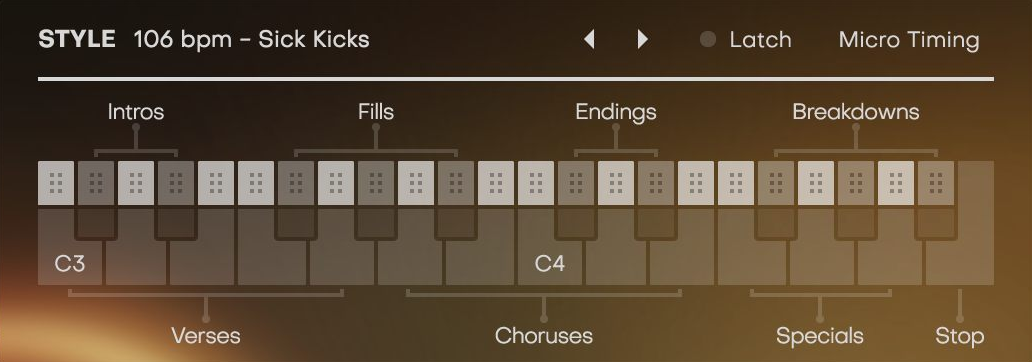
Styles are broken down into Song Parts: You have Intros, Verses, Choruses, Breakdowns, Fills, Endings, and bonus parts called “Specials”.
Styles Menu
In this menu, you can select one of the 30 Styles by either clicking a name and opening the menu, or by using the arrows to step through the list.
Styles are organized by tempo (bpm).
Each Style features 23 individual Song Parts that are displayed on the right half of the Interactive Keyboard:
Style Phrase Section
Note: Styles are not editable within Virtual Drummer, but you can edit Styles and Parts outside of Virtual Drummer by using the Phrase Drag and Drop feature.
Song Phrases and How to Play Them
- All Phrases always play in sync with the DAW. This means you can jump between Song Phrases freely without retriggering the Phrase. This is great for creating lively, non-repetitive drum performances.
- Of each group of Phrases – Intro, Verse, Chorus and so on – there are variations, increasing in intensity as you move up the keyboard. Some of those Song Phrases loop, some play only once after you hit the key, while others only play while you hold a key.
- Song Phrases assigned to white keys are the looping parts – Verses, Choruses, Specials. In Latch mode, they keep repeating until you hit a different key.
- Parts that start, end, or break up the song such as Intros, Fills, Breakdowns and Endings are assigned to black keys. These Phrases usually play only once after you select them, or play only as long as you hold the key (in Latch mode).
| White Key Part | Black Key Part | Description | How to Play |
| Intro 1 | Plays a short intro and continues with selected looped part. | With playback stopped, play key. | |
| Intro 2 | Plays a longer intro and continues with selected looped part. Can be interrupted anytime by selecting a white key part. | With playback stopped, play key. | |
| Verse 1-5 | 5 verse variations in ascending order of intensity. | Hit key to select. Verses keep playing until another part is selected. | |
| Fill 1-3 | Hit key to select. While a Fill is playing, you can select the subsequent part, otherwise it will fall back to the previously selected looped part. | ||
| Chorus 1-5 | 5 chorus variations in ascending order of intensity. | Hit key to select. Choruses keep playing until another part is selected. | |
| Special 1-4 |
Extra groove variations and "bonus" parts in ascending order of intensity. |
Hit key to select. Special parts keep playing until an- otherpart is selected. | |
| Breakdown 1-3 | Use these song parts whenever you want to temporarily vary/tone down the drum performance. | Plays immediately as long as you hold the key and falls back to previously selected part after releasing it. | |
| Ending 1 | Plays a short ending immediately. |
Hit the key at any time in the part to trigger the ending. You may want to quantize the note after recording it. |
|
| Ending 2 | Plays a longer ending at the end of the current phrase. | Hit the key anytime, the ending will play automatically at the next possible position, playback will stop. |
Automatic Crash Cymbals
Virtual Drummer will automatically play Crash cymbals when it falls back from a Fill into a Looped Part.
Technically, the first cymbal hit (Hi-Hat or Ride) at the beginning of the part following the Fill will be replaced by a Crash Cymbal. If there is no Hi-Hat or Ride cymbal, there will be no Crash Cymbal.
Note: You can also manually add Crash Cymbals by using the MIDI notes C#2 or A2. Make sure to quantize your Crash Cymbal events.
Building Songs using MIDI Drag and Drop
Virtual Drummer lets you drag Song Parts from the Interactive Keyboard into any track of your DAW, where it will be converted to MIDI notes.
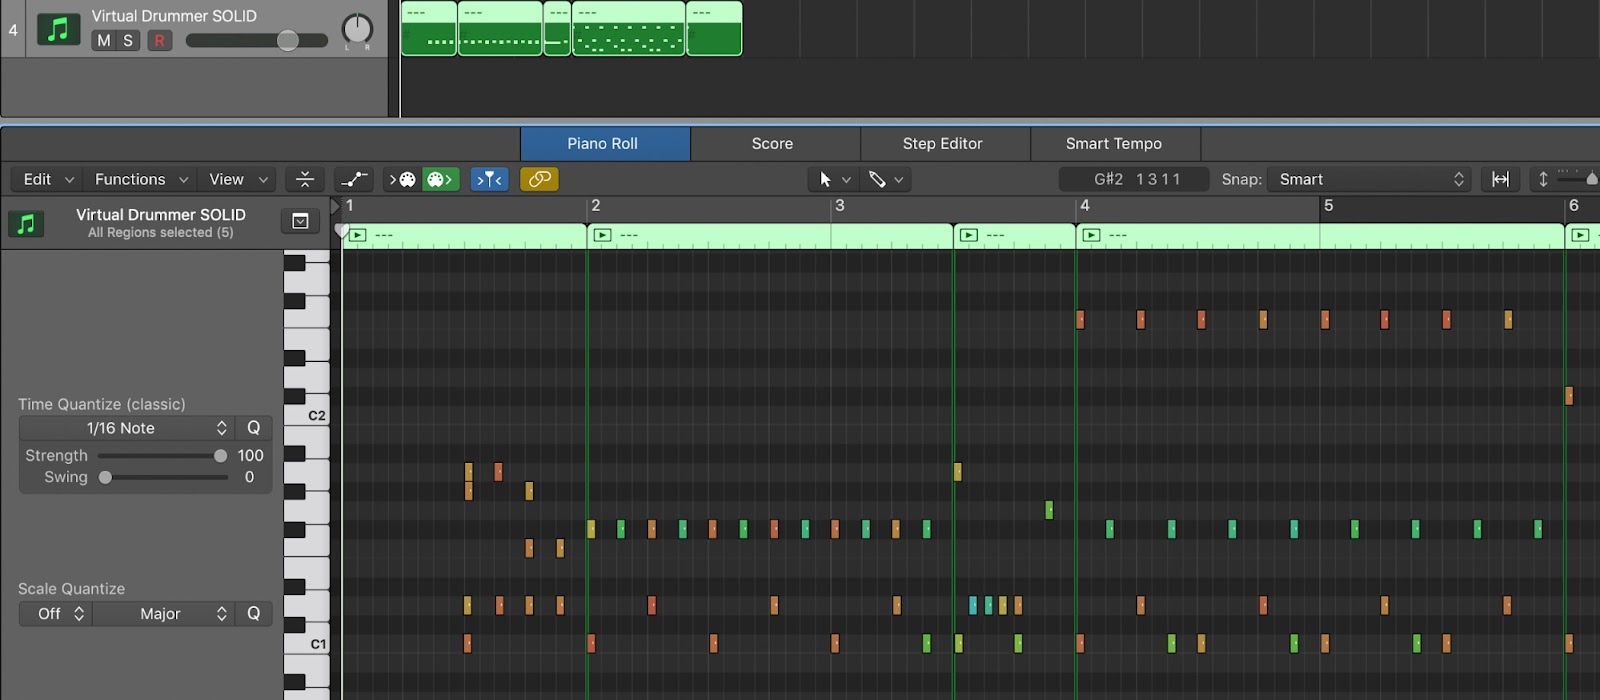
MIDI regions/notes created by dragging an Intro, Verse, Fill, Chorus and Ending into Logic Pro
To drag a Song Part from Virtual Drummer into your song, click and hold in the dotted drag area of any Song Part key on the Interactive Keyboard and drag the mouse pointer over to the target track.
Things you can do Using Drag and Drop
- You can edit a Virtual Drummer Song Part just like any other MIDI sequence - e.g. change note positions, velocities, or add instruments,
- You can combine Song Parts from various Styles into one song. Just switch Styles and drag away.
- Virtual Drummers are all cross-compatible, so you can use SOLID Styles with PHAT, or just switch between Drummers if you find in the middle of mixing that you need a HEAVY kit.
- Best of all: You can even combine all of the above techniques freely to create your total custom drum performances.
Note: When you drag Intros, Fills and Endings, note that some of these start mid-bar, so you might sometimes have to adjust the start of the resulting MIDI region after dropping it. Also, while Virtual Drummer will internally shorten Choruses or Verses when you play a Fill, you’ll have to do it manually in dropped MIDI regions.
Global Playback Parameters
Latch

You find the Latch button right next to the Style menu.
If on, Virtual Drummer will keep playing even after keys are released, until either:
- Latch is switched off
- the Stop button is pressed
- an Ending phrase is triggered
- or the DAW is stopped while it’s playing.
Latch is extremely handy when using Style phrases and a combination of white & black keys. The Drummer will fluently switch between the different grooves, fills and other Song Parts.
Note: A Sustain Pedal can be used as a temporary Latch (but does not affect the appearance of Latch switch). Lifting the Sustain Pedal stops the performance when no keys are held.
Micro Timing

Micro Timing Bar
Right next to the Latch button you’ll find the Micro Timing button. Clicking it opens the Micro Timing Bar, offering four parameters to adjust the drummer’s timing.
Speed
This three-way switch allows you to set the drummer to half time or double time in relation to the song tempo.
Feel
With this control you can tell Virtual Drummer to push or play laid back, i.e. it affects the overall timing of the drum performance. Push will gradually advance offbeats, whereas Pull will delay them.
Swing
This knob gradually applies a shuffle feel to the drum performance by delaying the offbeats.
Depending on the selected style, 8th or 16th note offbeats will be affected. At maximum position, the offbeat will have the same timing as the last note of a triplet.
Not all phrases contain 8th or 16th note offbeats – in these cases Swing control has no effect.
Player Sync
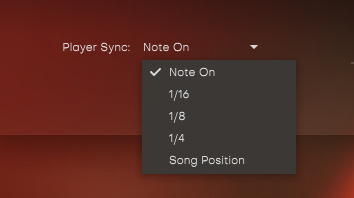
You can quantize the Virtual Drummer player to match the playback, this setting can be found in the micro timing overlay. Quantize to the current grid (Song Position), 1/4, 1/8, or 1/16 notes. This new feature keeps the Virtual Drummer always in sync with the DAW timing position to make sure you have the phrase in time and on the right beat. Give it a try!
Humanize
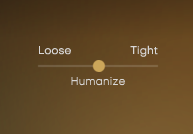
Using this knob you can gradually quantize the drummer’s performance. In the center position, the timing of drum hits will be exactly like the drummer played it when recording the performance.
In the minimum knob position, the timing will get more loose, as the subtle deviations of the drummer’s performance are increased. As you turn the knob to the right, hits will get moved towards the perfect quantize grid position.
Drum Kit Section
Drum Kits of VD LEGEND
Choose from five different drum kits, each one representing a physical drum kit – i.e. selection of instruments (Kick, Snare, Toms…) as well as their tunings, microphone selections and settings – all adjusted to work well together as a whole.
Note: For a detailed description of the Drum Kits of your Virtual Drummer(s) please check out the Drum Kit and Mix Preset Reference at the end of this document.
Drum Kit Slider
This is the virtual slider to the left of the virtual drum kit in the center of Virtual Drummer. Turn it up to gradually for different effects, based on the Virtual Drummer title you are using:
Dust
The Dust slider allows you to effortlessly blend the characteristics of modern and historic drum miking techniques. Are you looking for a clean contemporary beat, or the dusty rock sound from yesteryears? By adjusting the Dust slider, you control not only the microphone's proximity but also its era.
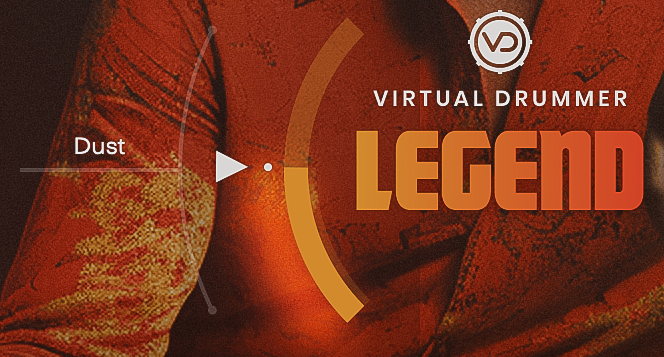
When set to 0, you can experience the full intimacy and clarity of modern miking. Turn it up to embrace the nostalgic, raw character of a historic drum recording sound. Whether, the Dust slider is your key to finding that perfect drum tone.
Juice
Make your acoustic drums sound more like a machine, or make your drum machine sound more acoustic - whichever angle you prefer.

The Juice fader sends the drum signal through a chain of gorgeous microphones in full bandwidth hifi.
It offers a seamless transition from archetypical sample aesthetic to a completely natural variant. In many situations a touch of an acoustic quality is a nice enhancement, even if you’re going for an overall artificial vibe.
Smack
This is the virtual slider to the right of the virtual drum kit selection of Virtual Drummer BRUTE. Technically Smack adds additional kit microphone channels chosen, positioned and processed for extra punch.
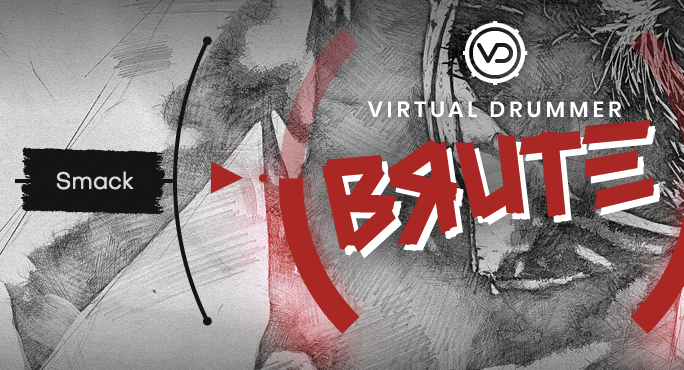
Why, you ask? In modern rock productions, drums often take a step back behind an omnipresent guitar wall. Most engineers try to still keep the drums' impact by creating short extra attacks with transient designer plugins and similar tools. This is a reasonable approach, but can easily sound “clicky” when overdone. The Smack fader creates a similar but smoother effect by pulling up extra microphones that naturally captures mostly attack, plus punchy analog processing that was directly printed during recording.
Slam
Adds “slam” (also referred to as “punch” or “snap”) to the sound of your drum kit. Technically Slam is created by multi-channel audio processing on the Instrument Channels, which distinguishes it from the Saturate or Maximizer.
Grit
This is the virtual slider to the right of the virtual drum kit selection of Virtual Drummer DEEP. Arguably the most important fader of this plug-in. Turn it up for a more natural, organic sound on the individual drum channels.
Technically, the Grit fader crossfades between a regular close up mic’ing technique and a traditional, historic recording mic setup that was carefully chosen for every individual drum sound (fader all the way up), phase locked to the direct microphone techniques of today (fader all the way down).
In some other Virtual Drummers (e.g. BRUTE and HOT), the Grit control has been moved to the Master section (displayed as a knob):
Master Section of VD HOT
Think of this as a type of “aging” knob for the entire drum kit. The middle position is the recommended default, a nice balance between the hifi direct and the more natural sounding vintage microphones. Turn left to get a more direct, hifi sound, turn right for more organic, a bit “older” sounding drums.
Like the Smack fader, this is not a mere DSP effect but an actual choice between different microphone techniques.
Instrument Microphone Channels
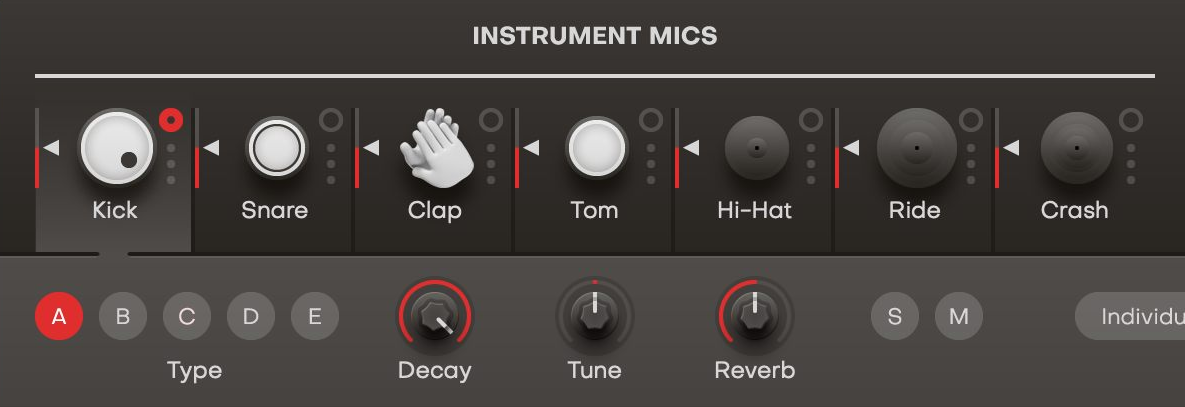
Instrument Channel of Virtual Drummer HOT
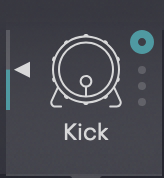
For each instrument (Kick, Snare, Clap, Hi-Hat) or group of instruments (Toms, Rides, Crashes) within Virtual Drummer there is an instrument microphone channel that lets you adjust volume and other parameters individually. You can switch between various drum instrument types, put them to Mute or Solo and also adjust Tuning, Decay and Reverb. This way, you can either just replace or adjust the Kick or Snare, or build entirely new kits and save them with your presets.
Note:
- Like all other parameters, Instrument Channel Settings will get overwritten when you load a new Preset. If you want to keep them, please save them in a Preset.
- Claps are available only in Virtual Drummer HOT
Selecting an Instrument Channel
To select an Instrument Channel, click the Instrument Icon.
Instrument Icon
The Select status will be indicated by a colored circle top right of the Instrument icon. When selected, all parameters visible in the bottom bar pertain to the selected Channel.
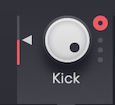
Adjusting Volume
Move the tiny triangle left from the Instrument Icon to adjust the volume of that Instrument (Group).
Selecting an Instrument Type
Click one of the letters labeled Type to select different instruments. There are up to four variations available per Instrument Channel.
Setting Decay
By default, the Decay envelope is off (knob all the way up). Turning it counter-clockwise shortens the envelope and therefore the length of that drum instrument. Shorter decay times can make a drum sound tighter and even artificial.
Adjusting the Tuning
You can adjust the tuning of every Instrument Channel by ±7 semitones (or 700 cents).
Reverb
This control adjusts the individual Instrument Channels send level to the Reverb unit in the Master Section.
M/S Buttons
You can mute/solo any instrument channel individually for editing. The solo status is indicated by a tiny yellow dot right next to the Instrument Icon, the mute status by a red dot.
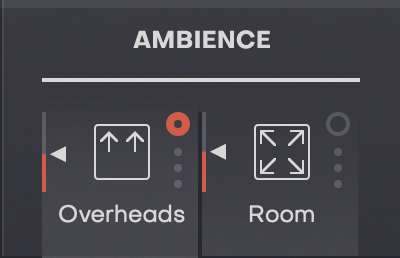
Ambience Channels

Ambience Channel Icons


Ambience Channel Strip
The two Ambience Channels in Virtual Drummer don’t carry individual instruments or effects, but are actually recorded room ambience signals from the original drum kit recording sessions:
- Overheads are a pair of microphones hanging left and right over the head of the drummer and picking up mainly the cymbals, but also a strong bleed signal from the other drums. Therefore, don’t be surprised if you turn down individual microphones and still hear the instrument. Overheads are used to create the stereo image and pick up transients as well as a coherent mix of the kit.
- Room comes from a pair of microphones placed at the back of the drum recording chamber, left and right behind the drum kit. This is not a Reverb, (there’s an extra control for that in the Mix section) but a dense, short room signal, great for adding depth and live feel to the drum kit.
Like the Instrument Channels, Ambience Channels can be selected, adjusted in volume, soloed/muted and sent to individual outputs. On top of that, they have three built-in audio processors allowing you to shape the Ambience signal.
Compressor
The Compressor lets you … well … compress the Overhead or Room signal, which increases the perceived density and presence of that signal even at lower levels.
Low-Pass / Hi-Pass Filters
With these filters, you can gradually attenuate high frequencies (Low-Pass) or low frequencies (Hi-Pass) in the Ambience channels. This is useful to clean certain frequency ranges from too much Ambience, making the dry signals stick out more, or for creative purposes, e.g. by turning Overheads fully up but cut some high frequencies for a trippy synthetic effect.
Individual Outputs

You can choose to send any Instrument and Ambience Channel either to the Master Section (default) or to an Individual Output that will be fed to an Aux bus in your DAW. This allows you to use the full multi-channel mixer functionality of your DAW with Virtual Drummer if you want to go deep, or just route individual signals into special effects processors.
The order in which parts are sent to the DAW is fixed as follows:
| PT | Logic | BRUTE | DEEP | HEAVY | HOT | LEGEND | PHAT | SOLID |
| 1 | 1-2 | Main | Main | Main | Main | Main | Main | Main |
| 2 | 3-4 | Kick | Kick | Kick | Kick | Kick | Kick | Kick |
| 3 | 5-6 | Snare | Snare | Snare | Snare | Snare | Snare | Snare |
| 4 | 7-8 | Hi-Hat | Hi-Hat | Tom | Clap | skip | Tom | Tom |
| 5 | 9-10 | Tom | Tom | Hi-Hat | Tom | Hi-Hat | Hi-Hat | Hi-Hat |
| 6 | 11-12 | Crash | Crash | Ride | Hi-Hat | Tom | Ride | Ride |
| 7 | 13-14 | Ride | Ride | Crash | Ride | Ride | Crash | Crash |
| 8 | 15-16 | OH | OH | OH | Crash | Crash | OH | OH |
| 9 | 17-18 | Room | Room | Room | OH | OH | Room | Room |
| 10 | 19-20 | Room | Room |
The exact setup of a multi-output Virtual Drummer will depend largely on your digital audio workstation (DAW), so we recommend checking out the corresponding instructions in your DAWs user guide. The basic steps look like this:
- Load a multi-output version of Virtual Drummer. This usually happens when selecting it from a menu of available virtual instruments, e.g. in the AU Instrument menu in Logic.
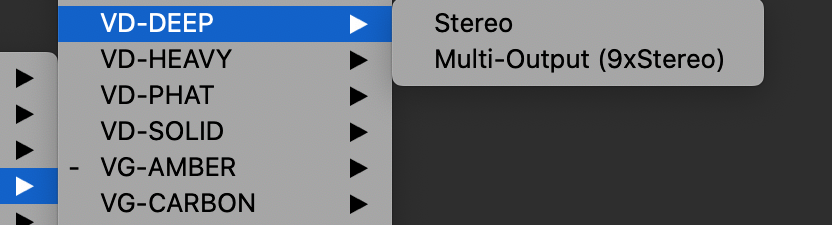
Plugin menu with Multi-Output options in Logic Pro
- Set up a number of Aux Channels for that multi-output instrument. In Logic, for example, after instantiating a multi-output Virtual Drummer, you will find a “+” icon in the Mixer channel of that instrument.
Multi-Output options in Logic Pro
- Click it to create additional Aux buses and you’ll see and hear those Virtual Drummer channels you set to “Individual” separated out to those buses.
- See How to use UJAM's drum plug-ins in Multi-Output mode for more info.
Mix Presets
This section is designed to provide you with the maximum control over the sound with a minimum set of controls – but don’t be fooled: under the hood, you’re programming a fully-featured mixing console with channel strips, busses and insert processors.
Each Mix Preset is a total recall setting for the internal mixing console. The Presets are selected and named specifically for the genre of your Virtual Drummer.

Mix Presets of VD LEGEND
Note: For a detailed description of the Mix Presets of your Virtual Drummer(s) please check out the Drum Kit and Mix Preset Reference at the end of this document.
Amount
This is the virtual slider to the right of the center of Virtual Drummer. When it’s all the way down, switching Mix Presets will have no effect on the output of your Virtual Drummer. Turn it up to gradually “dial in” the Mix Presets.
Amount Slider of VD BRUTE
What happens is that technically hundreds of individual hidden controls on Instrument, Ambience and Master busses gradually turn from their default setting towards the setting of the Mix Preset.
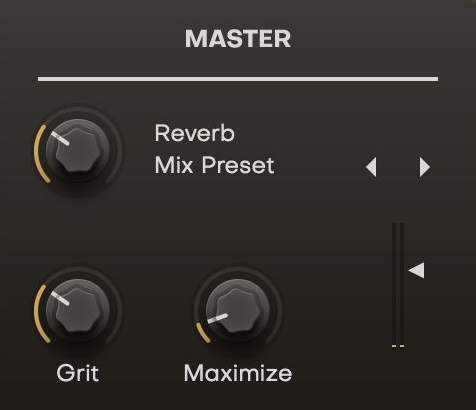
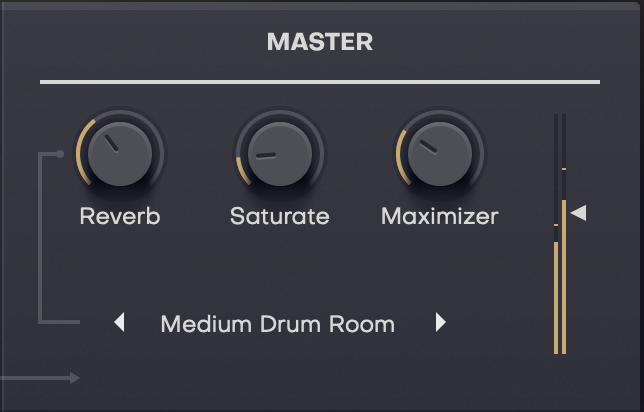
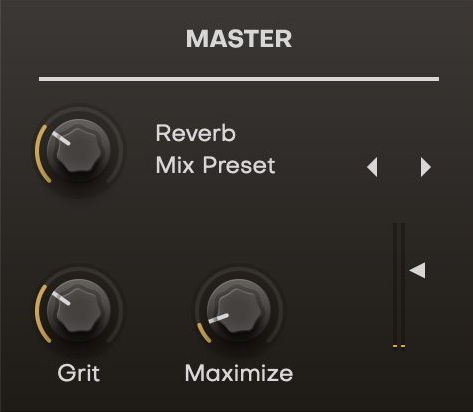
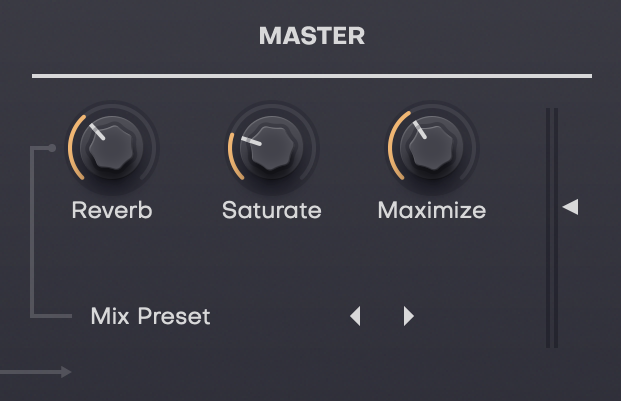
Master Section
Master Section of VD SOLID
The Master section gives you more detailed control over the global mix. It lets you choose a Reverb preset and adjust Reverb Level, it features a Saturate, Grit or Color knob (depending on the title) as well as a Maximizer, and the Volume slider sports a Level Meter.
Reverb
On top of the real recorded Overhead and Room signals, Virtual Drummer also features a Reverb section that allows you to add convolution reverb, individually adjustable per Instrument Channel.
Reverb Knob
The Reverb knob lets you adjust the master level for the reverb bus. It is independent from the Amount control of the Mix preset, so you’re free e.g. to have a fully unprocessed kit with the large studio room.
Reverb Presets
Either click on the Reverb name or use the arrows to change the Reverb program.
- By default, every Mix Preset also has a reverb preset to make sure the room ambiance matches the purpose. Select the ‘Mix Preset’ Reverb option, and the Reverb you hear will automatically change depending on which Mix Preset is selected
- In addition, Virtual Drummer offers four or five other, rather self-explanatory reverb programs.
Note: Keep in mind that changing the Mix Preset will overwrite your Reverb Type selection
Reverb Aux Returns | VD LEGEND
| Reverb | Description |
| Don’s Delay | Vintage-inspired slap delay capturing the essence of a bygone era. |
| Roger’s Reverb | Deep and expansive reverb for a spacious sound. |
| Steve’s Spring | Authentic 70s spring reverb with a unique character. |
| Ralph’s Room | Brief and precise room reverb, providing immediacy. |
| Simon’s Saturation | Intensifies the sound, rendering a denser, richer feel. |
Reverb Aux Returns | VD HOT
| Reverb | Description |
| Doja’s Delay | A rather attractive dotted 8th ping pong delay. |
| Gayle’s Glitz | Big and bright. |
| Scotty’s Spring | A spring reverb that sounds a bit broken and ‘flimsy’, but very cool nonetheless! |
| Ed’s Expanse | An ultra-short stereo extender room. |
| Dua’s Drive | A little saturation never hurt anybody. |
Reverb Aux Returns | VD BRUTE
| Reverb | Description |
| Chad’s Chamber | A classic wide room with a lot of punchy midrange. |
| Pete’s PA | Parallel processing through mics in front of a questionable PA |
| Bon’s Booth | The Led Zeppelin 16th note trick. Try it. Thou shalt not regret it. |
| Danny’s Darkness | A dark room, warmer and slightly longer than the rest. |
| Richie’s Rage |
If you’d rather run your drums through a parallel tube screamer. Note: this will create floor noise and sound decidedly non-hifi, so use at your own risk (but we strongly recommend that you do) |
Color (LEGEND)
Using the Color knob, you can effortlessly shape your drum tone, transitioning from a warm resonance to crisp brightness. It's seamlessly integrated with the Dust control: while adjusting one, the system intelligently manages their interaction. With Dust elevated, the Color knob transitions between two distinctive historical microphone sets.
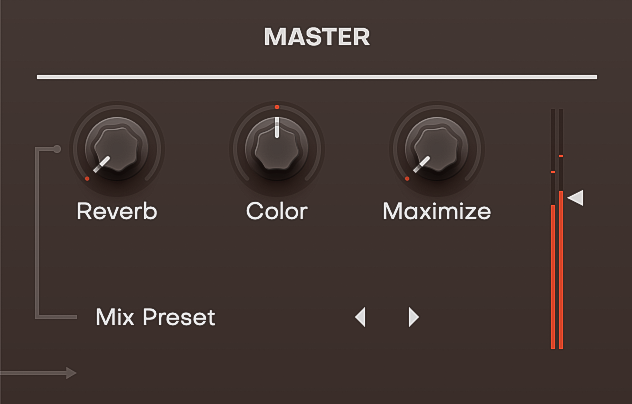
Master Section of VD LEGEND
Grit (HOT | BRUTE)
Master Section of VD HOT
Technically, the Grit control crossfades between a regular close up mic’ing technique and a traditional, historic recording mic setup that was carefully chosen for every individual drum sound (knob all the way up), phase locked to the direct microphone techniques of today (knob all the way down).
Saturate (DEEP | HEAVY | SOLID | PHAT)
Master Section of VD DEEP
Processor adds harmonic distortion to the master signal of Virtual Drummer, affecting the dynamic behavior as well as the overall dirtiness of the signal. In lower settings, Saturate creates a nice little lo-fi edge, whereas in higher settings of the control the sound will become pumping and distorted - which sometimes is exactly what you want.
Maximizer
The Maximizer is a popular audio processor that maximizes the perceived volume of a signal without actually raising it. Higher maximizer settings result in the drums cutting through a mix even at lower levels, helping you avoid internal distortion in Virtual Drummer because of too-high volume levels.
Note: Always make sure to experiment with these for the right balance of Maximizer, Saturate and Volume settings in order to match the rest of your production.
Volume
Use the triangle to adjust the audio output volume of Virtual Drummer for maintaining an optimal input level into the mixer or subsequent audio processors.

Volume Sider | Level Meter
The Level Meter helps you avoid internal clipping - which is quite important because it’s easy to overdrive the Master output which can lead to ugly digital distortion.
Drum Kit Reference
The following paragraphs give you detailed descriptions of the Drum Kits in various Virtual Drummers.
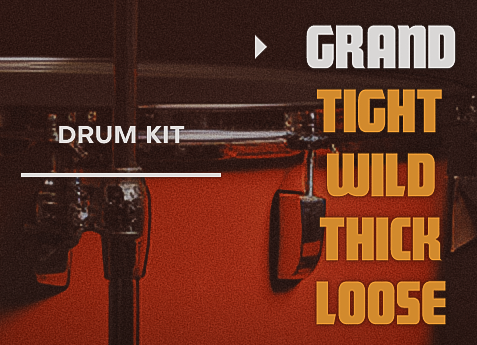
LEGEND
| Kit | Description | Use |
| GRAND | State-of-the-art sound design using microphone techniques from the early '70s. Evokes the gold standard pop rock of its time. | Perfect for tracks that require a classic pop-rock feel reminiscent of popular bands from the '70s. |
| TIGHT | Compared to GRAND, this kit features higher tuning, smaller drums, and tightly stretched drumheads, yielding a short and crisp sound. | Ideal for funk-inspired tracks with a bright, snappy drum sound, channeling that classic funk era. |
| WILD | A central, prominent sound that's a tad muffled. While not quite HiFi, it carries a dry characteristic. | Suited for rock tracks that need a gritty, dry drum sound reminiscent of classic rock hits. |
| THICK | This kit offers a prominent HiFi sound. | Perfect backdrop for iconic rock and pop hits that require noticeable drums. |
| LOOSE | A more neutral kit that doesn't lean too heavily in any characteristic direction, providing a balanced sound between the other kits. | Best for tracks where the drums need to be versatile and leave space for other instrumental elements. |
HOT
| Kit | Description | Use |
| BOOM | A classic Hip Hop kit: long and boomy bass drum, short and snappy snares, and toms and cymbals that, much like the machines that inspired this kit, sound nothing like the real thing | Perfect for most Hip Hop and Rap applications, or if you need a sub bass on your kick drum (the ‘Decay’ control can be lowered to remove this). |
| WAVE | The archetypical combination of short kicks and extra large snares. Don’t be fooled by the dark tone of the hihat: much like the classic samples it was chosen after, it somehow always works extremely well in a mix context. | For Synthwave or anything “80s”. |
| VANILLA | Extremely punchy kicks and snares, and we are happy to report that we likely found the exact hihat model that led to a sample used in 3829347 dancefloor productions. | This kit is definitely more oriented toward EDM and electronic music. |
| FRESH | This vintage kit gives you that ‘old’ aesthetic that most people these days would associate with ‘drum loops’. Please also note the claps are purposefully untight for that instant Disco vibe. | For a ‘vintage’ aesthetic, but depending on the position of the Juice slider and Mix Modes, it can also give you those really big and dirty Rock drums found on many iconic 70s records. |
| BRITTLE | A very particular kind of snare with almost metallic transients, and a very particular kind of bass drum that is unusually high to leave enough room for super low bass parts. The sidestick key in this kit contains an extra mini piccolo snare. Experimentation with extreme tunings is highly recommended for all kit pieces. | This is your ideal drum kit for Trap music. |
BRUTE
| Kit | Description | Use |
| DIRTY | Dry, punchy and short, this is the straight to the point Punk Rocker among the kits. Also features what is often referred to as “Potato Toms” (super short toms best suited for fills that sound like you emptied a bag of potatoes over them) | Great for high tempos. Due to its short sustains, also very suitable for detuning and using in other genres. |
| NOBLE | Smooth and slightly vintage. The Gentleman for fatness and class. Also features an extremely deep and fat set of three big floor toms. | Bass and snaredrum are prepared to not have any ringing pitches, giving them a very universal “fits anything” quality. Also great for all kinds of vintage aesthetics. |
| PRIME |
The most common type of rock kit. Wide, open, with a healthy amount of sustain and resonance, but not overdone. Same goes for the toms, with a lot of sustain yet clearly defined attack. |
From the 90s to today, these drums can be found in lots of productions that sound natural yet powerful. |
| TIGHT | Funky and aggressive, this kit is the classic crossover combination of an extremely deep and short bassdrum with an aggressive piccolo snare that takes absolutely no prisoners. |
Use or add this if - you think your backbeat is still not aggressive enough - you intend to inflict harm by means of snare drum fill - you are Lars Ulrich in search for a new angle |
| DARK | Irresponsibly tuned and proud of it, this low pitch kit has sustain in abundance and that popular “drummer has been beating me to death since 2 hours” appeal. | While clearly being the garage and underground go-to candidate, this kit is also super fat and thus can be used for anything big and juicy. |
DEEP
| Kit | Description | Use |
| WIDE | Long and resonating. A wooden snare with extremely long sustain meets a ridiculously big bassdrum. | Loose and relaxed soul, late 70s session drums or as extra flavour on urban Hiphop grooves. |
| RICH | Traditional tuning used by many funk and soul drummers in the late 60s and early 70s. | Whenever you want a “historic” vibe, be it for main drums or drumloop aesthetic, this is a good place to start. |
| CLASSIC | The “one size fits all” drumkit, very natural yet processing friendly. | This works for pretty much everything. |
| SHORT | Damped drums, prepared with towels and that classic Ringo wallet. | Damping is either very 60s, or very pop, depending on the mix preset you run this through. Best suited for slightly lower velocities. |
| PUNCH | Used to be known as the “Disco Kit” - Extremely short and punchy tuning and preparation. | Obviously great for what the name suggests, but also the best starting point for “electronic drums that are alive” with lots of processing. |
SOLID
| Kit | Description | Use... |
| SOFT | Warm, soft kit, ranging from very low to mid dynamics (soft to medium hits) | … whenever you need subtle drums that don’t dominate the song and where the drummer never hits hard. |
| DEEP | Deep, full drum kit, providing a strong foundation. | … particularly in grooving acoustic music, but generally anywhere where you need the drum kit to provide bottom end and foundation. |
| NATURAL | The most natural, generic kit. | … for a wide range of styles, because it’s a great starting point and very versatile. If you’re unsure, start with Natural kit. |
| TIGHT | Small, tight kit, with a light, punchy snare. | … in Funk, Hip Hop, R’n’B and generally when you need the kit to support the groove with lots of punchy transients and without sounding too deep or hard. |
| HARD | Very punchy kit, hit extra hard, lots of attack transients |
…in Rock and Modern Rock. Pretty much the opposite of Soft Kit – use this one when you need a kit cutting through with a strong foundation and lots of punch. |
PHAT
| Kit | Description | Use... |
| DRY | Warm, balanced and natural-sounding drum kit with a deep snare. |
… as your go-to kit for natural, unprocessed- sounding material. |
| FRESH | Open-sounding kit with more room, a small open kick and a snare that glues in nicely. | … to make drums shine in sparse, uncluttered arrangements with not too many tracks. |
| DEEP | Low-tuned, ultra-fat kit with an almost electronic- sounding kick and a snare with lots of low end. | … for 70s and generally retro dance material, but also modern pop and rock - whenever you need deep drums. |
| HIP | Hard-knocking sound, tuned a little higher with a resonant kick, light, almost electronic-sounding hats. |
… for modern dance styles. Works perfectly with low synth basses/subs. |
| FAT | Natural kit with a low- thrusting kick and a fat-yet- tight snare. | … anything 4-on-the-floor and generally pop, rock and dance that needs a fat kit. |
HEAVY
| Kit | Description | Use... |
| OPEN | Very natural and open-sounding kit, warm and fat, with unobtrusive snare and big toms. |
… for general-purpose pop, rock and acoustic power drums. |
| FAT | Kit with huge force, a powerful snare and a fat, deep kick. |
… for more rock-oriented material that needs a strong kick foundation and a snare that cuts through. |
| PUNCH | Tight and very punchy kit with the snare tuned high and accent on the kick, slightly more processed. | … wherever you want the drums to stick out or hold up against walls of guitars. |
| DEEP |
Low-tuned, resonant kit, played medium-hard. |
… if you’re after a more old-fashioned drum sound. |
| HARD |
The hard rock kit, with a punchy rock snare and a present kick drum. |
… for hard rock to metal, where subtlety would get in the way |
Mix Preset Reference
The following paragraphs give you detailed descriptions of the Mix Presets in various Virtual Drummers.
The combination of six Mix Presets, a Room control, Overheads control, a Reverb knob, and a Volume button gives you extremely versatile control over the drum sound without requiring any sound engineering skills.
Selecting one of the six Mix Presets will change hundreds of parameters of Virtual Drummer’s mixing console ‘under the hood’. Again, the preset names should be quite telling. Experiment with the Amount slider to the left of the Mixing Console presets for a heavily processed (high setting) or subtly altered (low setting) sound.
LEGEND
| Mix Preset | Description | Use for... | Room |
| DRY | Completely dry sound with emphasized warm frequencies. | For tracks requiring a raw and unprocessed drum feel. | A small, acoustically treated room with minimal reflections. |
| SLAM | Punchy, significant compression with consistent dynamics and a defined attack. | Ideal for tracks seeking a driven, front-and-center drum sound. | A modern studio booth with high-end dampening. |
| BOOST | Enhanced with saturation to increase drum presence in the mix. | For mixes where drums need to command attention and dominate. | A space which accentuates the drum's resonance. |
| WORN | Classic mix with an aged quality; not HiFi, lacking some highs and lows. | Perfect for nostalgic tracks or genres emulating older recording styles. | A dimly lit, vintage studio with worn-out rugs. |
| HIFI | Clear, precise, and the opposite of WORN. | For modern tracks requiring pristine and sharp drum sounds. | A state-of-the-art recording room. |
| TAPE | Ranges from a sound of a high-quality tape to an overused one. | Best for adding character, whether it's a fresh tape sound or a vintage, reused tape feel. | A retro studio with reel-to-reel tape machines. |
BRUTE
| Mix Preset | Description | Use for... | Room |
| GENTLE | The “reasonable” way of drum processing. Enhances the Sub and Air bands and adds smooth parallel compression. | ...whenever you don’t want to do anything wrong or just want a reliably hifi sound | Very wide room, optimized to be mostly “invisible”. |
| SLAM | A parade of compression techniques, starting with rather subtle direct channel treatment and eventually ending in full on 1176 four button squashing of the room mics. | ...whenever you are in need of punch reserves ranging from agreeable in-your-face to absolutely irresponsible amounts. | A tempo synced room slapback. |
| BITE | The opposite of the previous mix mode, using envelope shapers and shameless 7k boosts for biting, aggressive attack transients. | ...whenever you need short transients and an overall mid-to-high-range spectrum to cut through walls of guitars and the Slack fader was still not enough for you. | Sustainer fed into two very bright guitar amps panned hard left and right. |
| CRUSH | Crossfades from individual parallel to full on master bus saturation. | ...whenever you need things to be lofi and dirty. Middle positions are also a great alternative to the Slam mode. | Short reverb fed into dark and rumbling PA speakers. |
| BOUNCE | Modeled after a ridiculously expensive mastering rack, this mix mode goes for maximum attack while staying smooth, fat and, well, bouncy. | ...whenever you are aiming for modern aesthetics that flirt with the current day hip hop influences on rock music. | Nonlinear “whoosh” type of reverb to give back some sustain while remaining slightly detached from the dry signals. |
| WIDE | It’s wide. Very wide. Also uses longer release times to make the drums pump and breathe. Clearly overprocessed and proud of it. | ...whenever your arrangement features a “drums only” breakdown. | Fat plate bordering on the forbidden “gated” setting. |
DEEP
| Mix Preset | Description | Use for... | Room |
| GENTLE | Classic Hifi-ish enhancements. Adds that extra air band, bolder low frequency attitude and some reasonable but not overdone dynamics. | ...whenever you like what you’re hearing, but just want it to sound a bit more polished. | A short but wide room, carefully processed to add width without becoming too obvious. |
| GARAGE | Focus on midrange with lots of character and some saturation on the room and overhead channels. To this day known as either “british” or “american” style of mixing, depending on the country in which you ask who came up with this. | ...glueing everything together and adding some subtle dirt. Also use whenever you feel your mix is not “analog enough”. | A short old reverb running through a stereo PA and two guitar amps. |
| AGED | Simulates old signal paths with way too many transformers and those rotten trebles that you can’t just dial in with a regular EQ. | ...making your drums sound old. Like, really old. Also great to make anything you programmed sound like a sampled drumloop that you’ve found on some old Funk record. | Rusty spring reverb - completely mono and proud of it. |
| DARK | Dark filtering plus some rather bold transient treatments that turn any drum into something completely different. | ...instant remix happiness. | A dark plate that is as long as it is wide. |
| LOFI | Saturation, subtle distortion and dark overdrive make this the outlaw among the mix presets. | ...whenever you feel like your drums should protest against something. | Super short, aggressive spring reverb. |
| SLAM | A multi stage algorithm that will first add smooth parallel compression, then punchy single instrument compression and finally aggressive bus compression. | ...making everything up to 5 times as big as it was before. | A recording room that is just as heavily compressed as the rest of the mix preset. |
SOLID
| Mix Preset | Description | Use for... | Room |
| SMOOTH |
Tamed in the mid range, with subtle upper range. Only subtle dynamic treatment. |
Acoustic, natural sounding mixes, e.g. in Songwriter, Indie or Country music. | Large studio recording room |
| EDGE | “Rehearsal Room” sound – raw, powerful mids, medium compression, wall reflections. | Creating drums that bite, e.g. in Garage, Punk, EDM. | Drum booth with tiled walls |
| RETRO | Tape machine and analog console kind of sound, perfect for the 70’s and earlier. | Aging the sound of the drum kit, e.g. for 60s/70s impression. | Old drum booth with stone/wooden walls |
| BIG | Sound of a big stage, subtle dynamics and EQ for a more present sound. | The typical sonic image of 80s, soft rock and ballads. | Empty rock concert hall |
| POWER | Strong dynamic processing for extra punch, EQ-ing for presence. | All kinds of Rock. | Recording Room of a small studio |
| CRUSH | Exaggerated compression, medium EQ-ing and subtle distortion. | A crushed, “low bit-rate drum loop” sound for Punk, Sound Design, Experimental, EDM. | Concrete room |
PHAT
| Mix Preset | Description | Use for... | Room |
| CLOSE | Removes mid-range, adds lows and highs and generally makes the kit sound like it gets pulled closer to the microphones. | … drying out the sound of the drum kit for a super-dry, “attacky” sound. | Dampened studio recording room |
| BROAD | Significantly beefs up kick and snare, and adds punch to the overall kit. | … material that needs punchy, beefy drums, particularly 80s/90s styles. | Drum booth with tiled walls |
| BRIGHT | Adds edge and punch, making the kit sound much crisper and fresher. | … to make the drum stick out even against a lot of mid- range tracks play- ing. | Medium hall |
| PUNCH | Adds low end and virtually shortens the drum kit without making it artificial. | … when you need additional power but still a quite natural sounding kit. | Short, reflective booth |
| RATTLE | Adds lower mid-range and generally makes the drum kit sound like the screws got loosened. | … creating a drumloop-like, lofi character, great for drumloop-based electronic styles. | Recording Room of a small studio |
HEAVY
| Mix Preset | Description | Use for... | Room |
| HIFI | Big in bass and treble, attenuating the mid- range for that old- school ghetto blaster sound. | … late 70s and all 80s material, when you’re after a polished, not necessarily natural sound. | Large studio recording room |
| RAW | Adds bite and rawness to the sound by using a combination of EQ and multiband compression. | … adding a punk flavor and making the drums stick out. | Drum booth with tiled walls |
| RETRO | Subtly removes digital fidelity and adds a flavor of tape saturation. | … creating a vintage 60s to early 70s sound. | Old drum booth with stone/wooden walls |
| PUNCH | Exactly what the name says. | … exactly what the name says. | Empty rock concert hall |
| COMP | Adds punch and attack to the drum kit mainly by using a carefully tweaked combination per- instrument and master compression. | … making the transients more obvious and the drum kit more present, particularly in mix with a lot of mid-carrying instruments. | Recording Room of a small studio |
| CRUSH | Over-compression galore – add punch and sustain to the overall drum sound. | … creating the exact opposite of a natural drum kit with tons of punch and edge. | Medium hall |
MIDI Learn
Using Learn MIDI CC, you can assign almost any Virtual Drummer control to hardware controls of MIDI keyboards or other controllers.
To assign a control, you usually right-click or ctrl-click a control in Virtual Drummer to open the MIDI Learn context menu of your DAW.
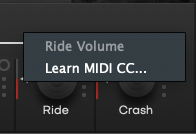
MIDI Learn
Automation
Almost all controls in Virtual Drummer can be automated. In combination with the Phrase select keys this is actually a very powerful way of creating more dynamic performances. For example, automate DRUM KIT or MIX PRESET to drastically change the sound between song parts.
For instructions on how to activate Virtual Drummer parameters for automation, please refer to your DAW’s user guide (in most cases, using the shortcut “a” will open the automation menu).
PreSonus Integration
With the Virtual Drummer 2.1 update we introduced an exclusive PreSonus piano roll integration for Studio One users running on version 4.6.2 or later! The names of styles and drum-elements are displayed on the keys of your piano roll to help you find the right styles and drums faster and easier for your track. The scale range of the styles and instruments are highlighted with a red line at the left side of your piano roll now. You can also use the Presonus Sound Variations View to create your drum tracks:
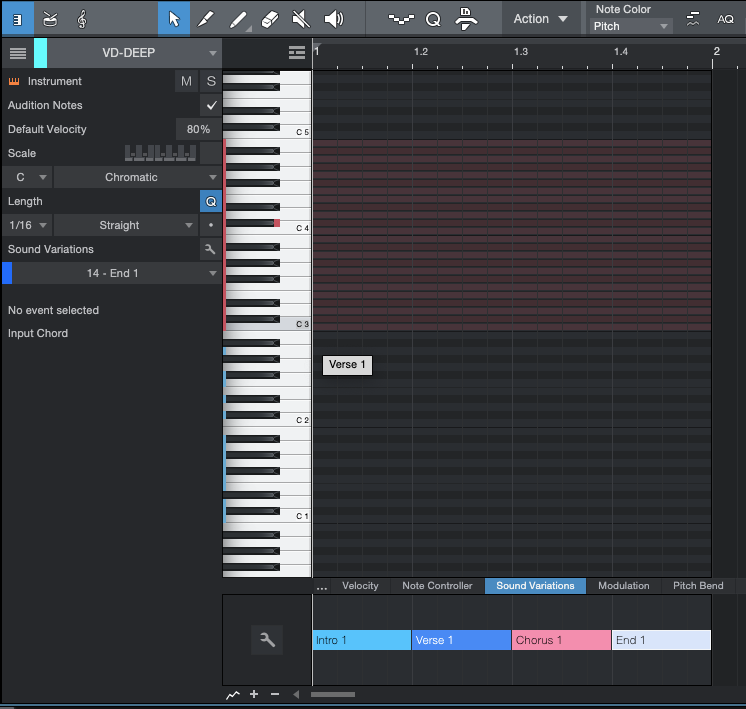
Presonus Studio One | Sound Variation View

Comments
0 comments
Article is closed for comments.